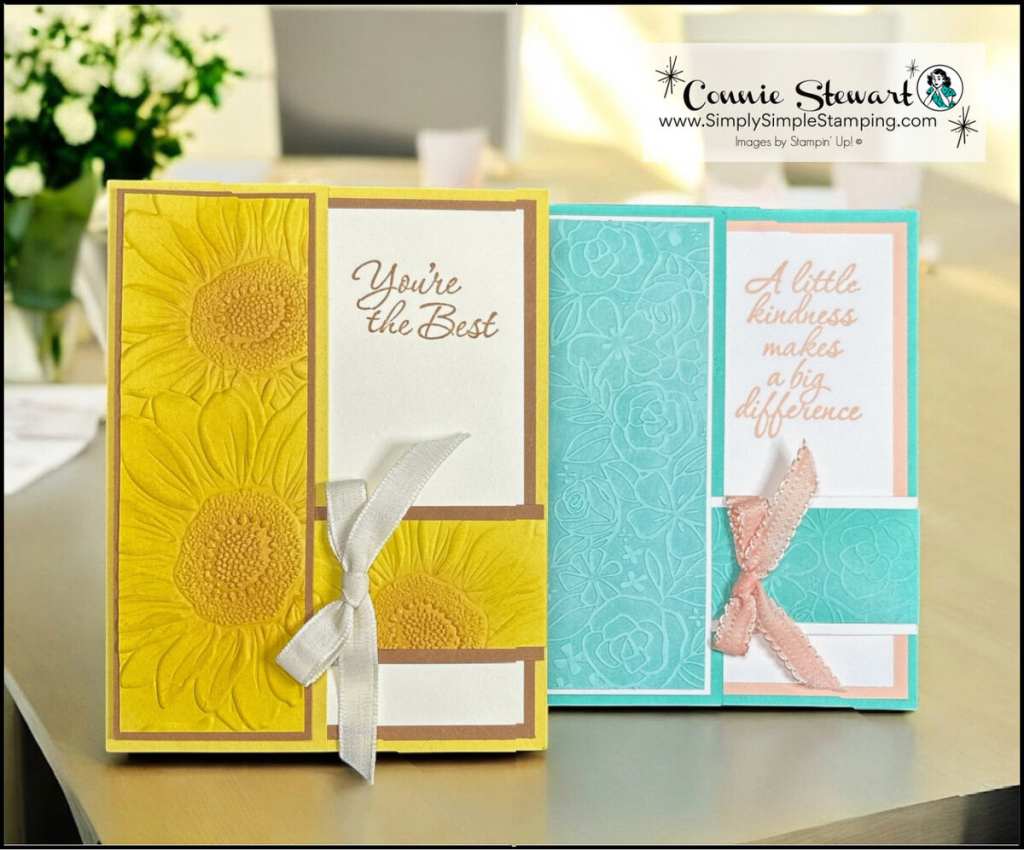
Embossed cards are like little rays of sunshine waiting to brighten someone’s day, and today I’m sharing how to make them absolutely glow with a simple inking technique that transforms ordinary embossing into something spectacular! Just like sunflowers naturally turn toward the light, these cards seem to radiate warmth and joy from every textured petal and dimensional detail. The magic happens when you take those beautiful embossed impressions and add depth with easy blending brush techniques that make each sunflower practically leap off the page. Whether you’re crafting a “you’re the best” encouragement or spreading a little kindness, these stunning cards carry your heartfelt message with the same uplifting energy as a field of golden blooms swaying in a summer breeze.
Both of these cards showcase the versatility of Stampin’ Up!’s incredible embossing folders – the sunny yellow beauty features the Sunflower embossing folder, while this fresh mint green card demonstrates the elegant floral patterns from the Glass & Gardens embossing folder. The Label Me Grateful stamp set provides those perfect heartfelt sentiments that make these cards so meaningful, whether you’re celebrating someone special or simply spreading encouragement. What I love most about this technique is how the same easy inking method transforms completely different embossing patterns into equally stunning results – proving that with the right approach, every embossed design can become amazing while being easy to make!

Embossed Cards with Flap Closure | Video Tutorial
Get ready to watch your embossing folders come alive in ways you never imagined – I’m revealing my secret for adding that perfect pop of color that makes every detail sing, plus showing you the clever flap closure that turns a simple card into something truly special!

🌼 Which embossing folder from your stash are you most excited to try this technique on? Drop a comment below and tell me about your favorite Stampin’ Up! embossing folder – I love hearing which designs spark your creativity! And if you give this inking technique a try, I’d love to know how it worked for you and what color combinations you chose!
Ready to Create these Embossed Cards?
These cards are just that easy to make. Embossing, Blending Brush, and ink. That is all you need to make these cards!
- Darling Duckling:
- 8 ½” x 5 ½”, score at 4 ¼” (card base)
- Cut to 2 ⅛” x 5 ½”
- Cut the 2 ⅛” x 5 ½” piece to 1 ¾” x 5 ⅛” (embossed front)
- 3 ¼” x 1 ¼”, score at ½” (flap closure)
- 8 ½” x 5 ½”, score at 4 ¼” (card base)
- Pecan Pie:
- 1 ⅞” x 5 ¼” (card front layer)
- 2 ¾” x 1 ½” (flap closure layer)
- 4” x 5 ¼” (inside layer)
- Very Vanilla: 3 ¾” x 5” (inside message)
- Summer Splash:
- 8 ½” x 5 ½”, score at 4 ¼” (card base)
- Cut to 2 ⅛” x 5 ½”
- Cut the 2 ⅛” x 5 ½” piece to 1 ¾” x 5 ⅛” (embossed front)
- 3 ¼” x 1 ¼”, score at ½” (flap closure)
- 8 ½” x 5 ½”, score at 4 ¼” (card base)
- Basic White:
- 1 ⅞” x 5 ¼” (card front layer)
- 2 ¾” x 1 ½” (flap closure layer)
- 3 ¾” x 5” (inside message)
- Petal Pink: 4” x 5 ¼” (inside layer)
Don’t forget to print or save the FREE DOWNLOAD for today’s cards!
Stampin’ Up! Product List for Today’s Cards
Click on the picture to add to your cart
Thank you for choosing me to be your Stampin’ Up! Demonstrator!


Spend them on your next Stampin’ Up! order or save them up for a bigger purchase!
Pinterest-ing
Follow me on Pinterest and save this image to your Card Making Techniques board so you can easily find this tutorial whenever inspiration strikes – and don’t forget to check out all my other Stampin’ Up! tutorials and embossing tips while you’re there!

Join Me Thursday, DATE, for a Create with Connie YouTube Live!
9am Pacific * 10am Mountain * 11am Central * 12pm Eastern

Let’s create a fun Triple Z-Fold Card together!


