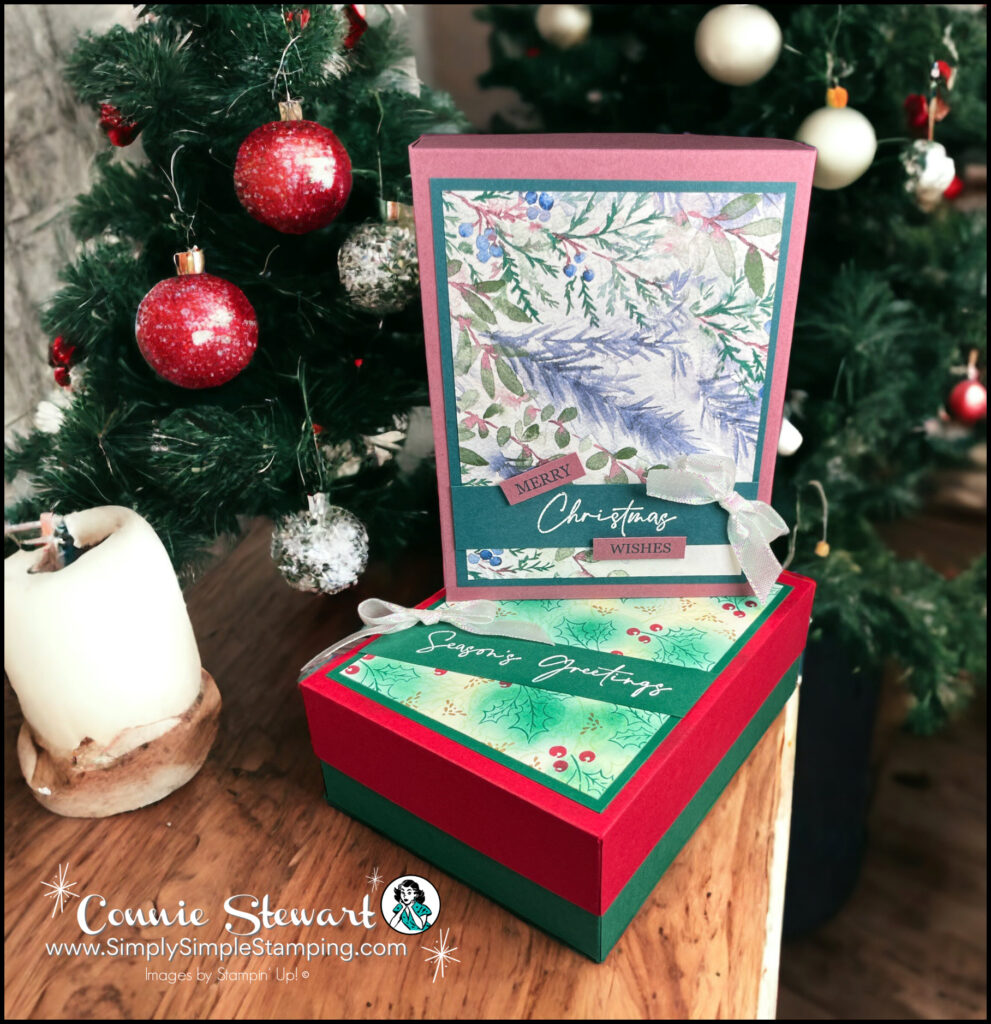
You can DIY a Christmas card box with a lid and fill it with handmade cards; it makes a great gift. Think it’s hard to make? Not at all!
Let me show you how to create the perfect Christmas packaging for your handmade cards. Let’s face it, everyone loves the gift of handmade cards.
Christmas Card Box Video Tutorial

Have trouble viewing the video? CLICK HERE
🎄 Are you excited to make a Christmas card box like this? What stamp set will you use to make and fill your box with? I’m super curious to hear!
CREATING THE BOX MAKER SHIM
If you don’t have the box maker shim, DEFINITELY create one! You will love having this tool in your stash of supplies.
- Window Sheet or Acetate Sheet from a Photopolymer stamp set – 2″ x 6 ¾” (can be more or less but keep it between 6″ and 8″) – score at ¾” and 1 ¼”
- Cardstock – 1″ x 6 ¾” (or the measurement of your Acetate Sheet) – score at ½”
Ready to Create the Greeting Card Boxes?
Wasn’t that the best packaging idea ever? I love to make boxes and when I use my favorite card idea as the ‘decoration’ on the box, it’s a win-win!


- Box – Misty Moonlight – 8 ½”x 10″, score at 2″ on all 4 sides
- Lid – Moody Mauve – 7″ x 8 ½”, score at 1 ¼” on all 4 sides WITH BOX SHIM in place
- ⅜” x 4 ¼”
- Pretty Peacock – 4 ¼” x 5 ½”
- 1″ x 4 ¼”
- Box – Shaded Spruce – 8 ½”x 10″, score at 2″ on all 4 sides
- 4 ¼” x 5 ½”
- 1″ x 5 ½”
- Lid – Real Red – 7″ x 8 ½”, score at 1 ¼” on all 4 sides WITH BOX SHIM in place
Don’t forget to save the FREE DOWNLOAD and the Diagram!

PIN IT! Want to save this Christmas Card Box Idea? Pin this image to your favorite Holiday Crafts Board!

Join Me Thursday, October 12, 2023, for a Create with Connie YouTube Live!
9am Pacific * 10am Mountain * 11am Central * 12pm Eastern

Let’s create an anterior Diagonal Fold Card together! Here is what you need to create along with me:
- Card Base: (2) 5 ½” x 8 ½”
- Designer Series Paper: 5 ¼” x 8 ½”
- Flash Card Coordinating Color: 2 ½” x 4″
- Flash Card Neutral: 2 ½” x 4″
- (2) 4″ x 5 ¼”
- Stamps, Ink, Stampin’ Dimensionals

I sure appreciate you stopping by! Do you plan to make this Christmas card box? If you enjoyed the video today, share please share it with a crafty friend; I SO appreciate that!


Connie -Great video! I still use my “original” shim from when you first showed it to us. The greatest idea!
Thanks so much for the box too! I can never seem to get my measurements right. This should help.
Sue
How do I pin this post to my Pinterest account?
You should be able to click on the picture and go to pinterest.
You are a great teacher, very clear instructions
CONNIE, THIS BOX TUTORIAL IS THE ANSWER TO MY PRAYERS, I COULD NEVER FIND A WAY TO FIT CARDS WITH BOWS AND A FEW LAYERS IN BOXES THAT ARE NOT DEEP ENOUGH BUT THANKS TO YOU NOW I CAN REALLY FIT MY CARDS IN THESE BOXES TO GIVE AWAY THIS CHRISTMAS.
THANK YOU SO MUCH FOR SHARING.
STAY HEALTHY AND SAFE.
XO
Thanks for sharing. I really wanted a decorative card box for my Christmas Card gifts. Super instructions and video;
If you are using heavy weight cardstock does your shim need to be made with the heavy weight also?
I’m using Stampin’ Up! cardstock and it’s pretty heavy but I would say use the same cardstock on your shim that you think you will use on a box.
Lovely idea, thanks for sharing. Gail H
I finally have the time to watch this video. OMG, you are the best!! I donate card packs and give them away as gifts. I have been using the punch board to make a 1 inch envelope box as the gift holder. This is so much better and uses 8 1/2 x 11 cardstock instead of 12 x 12. Thank you so much for this master class. I cannot wait to make my first box.
Connie, you are a jewel! I usually wind up making 3 to 4 lids trying to get one exact to fit a box I make and NOW, you my dear, have made it so easy for me. THANK YOU!! The shim will be a life saver, now I need to go over the beginning of the video and watch it closely to make the shim. You are so awesome to show us this fantastic technique!!
Duh!! I just now saw the shim instructions, thank you!!